Having just implemented yet another timeline (this time in PIXILAB Blocks), I got a little philosophical. Throughout my professional career so far, I’ve created no less than six timeline-based products, so I believe it’s fair to say I’ve got some perspective here. But I’ve also been interested in other kinds of timelines.
When I grew up I wasn’t at all interested in history (just like most other kids, I guess), and the way they taught it in school was extremely boring. However, as one grows older, it’s quite natural to begin asking what came before. Where did I come from? How did the society I grew up in come to be? Why did stuff seem to develop at an exponentially increasing rate during much of my lifetime? What is life anyway, and where did it come from? Why is our planet so amazing? What’s out there in space and “why is there something rather than nothing?” “Is there a God?”
Needless to say, there’s no lack of timelines to be philosophical about. So in a series of articles I will attempt to do a “timeline of timelines,” beginning with the software-kind and gradually working my way back to the beginning of the universe.
Software Timelines
The basic concept of a software timeline is simple. It’s a linear sequence of time/action pairs sorted in ascending time order. What’s needed to pull it off is essentially:
- A device that can generate or receive time for controlling the timeline.
- A memory to hold the list of time/action pairs.
- A “processor” that can perform the actions (sometimes called “cues”) at their designated times.
So here’s a brief look at the software timelines I’ve come up with. In chronological order, of course:
- Dataton MIC3.
- Dataton MICSOFT (first for the Apple II and then for the IBM PC).
- Dataton TRAX.
- Dataton WATCHOUT.
- PIXILAB Blocks.
Dataton
When I joined Dataton in 1979, it was just Björn and me. Dataton had just made a slide projector control box, initially devised as an add-on to the music synthesizer system the company was founded to develop. The synthesizer didn’t really sell, but we noticed there was some interest around this slide projector controller, so we gradually drifted off towards what we learned was called “multi-image”.
To make a multi-image slide-show you essentially tell multiple slide projectors which slide to show and when, ramping their lamps up and down at the right moments. The visuals were often synchronized to a sound track, with music and narration, coming off a tape recorder. This synchronization required a well defined and reasonably accurate concept of time, so a timeline of sorts made sense. Each action (“cue”) on that timeline was tied to the corresponding point along the audio tape by means of timecode. Timecode, recorded onto a separate tape track, was played back alongside the audio, thereby synchronizing the cues on the timeline to the audio.
MIC3
Multi-image was already dominated by other companies so we were a bit late. We decided to start small, coming up with the tiny MIC3, where MIC stood for “multi-image composer”. This was a small, handheld device, capable of programming up to eight slide projectors. It had:
- A small, alpha-numeric display for editing the timeline. Cues – each represented by a mnemonic letter – marched across the display from right to left as the show ran.
- Buttons to program/edit the cues and operate the device.
- A “modem” to record and play back digital signals, such as the timecode, onto analog audio tape (cassette or open reel).
- A serial communications data bus for connecting the slide projector control boxes.
- A 2048 byte battery-backed memory chip holding up to 1000 cues.
- A rudimentary processor (Intel 8050), with an internal 4096 bytes program memory.
The main challenge was to squeeze all of the desired functionality into those puny 4096 bytes of program memory. While the basics were fairly simple (as outlined above) the “devil is in the details”, as they say.
One such detail, which we learned along the way, was the need for a “back button”. Moving forward through a list of cues is straightforward – just perform each cue one by one. But you also need to step backwards to review sections of the show without having to start from the beginning every time. This was less trivial since the state of all the slide projectors depended on all the cues that came before that point along the timeline. A mechanism to simulate running all preceding cues in order to calculate the state was needed. This was also used when synchronizing to tape, where the timecode could start from any position along the tape by simply rewinding the tape to the desired spot.
After quite some struggling and late nights, I managed to get this all working. I believe there were a grand total of 1 byte to spare of those 4096 bytes of program memory.
MICSOFT
With the MIC3 out the door, along with some ensuing commercial success, our attention turned to making larger shows, with more slide projectors and more advanced programming capabilities. While MIC3 was developed in-house from the ground up, this wasn’t realistic for a more advanced system. There weren’t that many “professional” computers around at the time, but we decided on the Apple II. It had a real keyboard, a CRT monitor and floppy disks!
It also came with 48KB of memory (a 10x+ improvement over the MIC3). But there were many more features to cram in, and the show programming (for up to 56 projectors) also had to fit. So, again, the whole thing was written in assembly language. Since the Apple II didn’t have a serial port, we made our own plug-in board, also doubling as a copy protection dongle. We initially used the same slide projector control boxes, but had to develop an out-board box for recording and playing timecode and “cue tracks”. This box also acted as the clock source for running the timelines, since the Apple II didn’t have any internal timing chip.
In MICSOFT, the timeline was arranged as a vertical list, as you can see in the clip above. We wanted a more flexible approach for dealing with “animations”. MIC3 had rudimentary animation functions that worked by sequentially turning projector lamps on and off in rapid succession. While animated in this way, the lamps also could also be ramped up or faded out together, making the entire animation appear (or disappear) gradually. This called for a form of “multitasking”, since those actions had to be performed in parallell. MIC3 had hard-coded functions to do this, which was serviceable but not very flexible.
For MICSOFT a novel approach was devised, essentially turning each cue along the timeline into its own mini-timeline. While the main flow of cues was vertical – with timecode specified at the beginning of each line – each cue then consisted of its own, horizontally arranged mini-timeline. Often this was just a single instruction. But at times, it could contain an arbitrary list of instructions mixed with Waits, Repeat loops and even some conditions. Essentially, a slideshow in MICSOFT was a timeline of timelines!
Another somewhat interesting feature of MICSOFT for the Apple II was its ability to record a “manual fade”. This made it possible to create a custom lamp fade curve by recording the movement of a joystick used to control the projector’s lamp brightness. This was an early form of “DMX recording,” many years before DMX512 was invented.
MICSOFT was later ported to the IBM PC. This was a complete rewrite in C, since the Apple II version couldn’t run on the Intel CPU in the PC. The PC iteration retained the basic “timeline of timelines” idea of the Apple II version, but enhanced its capabilities as well as the user interface in many ways. The program was written for DOS (Windows wasn’t a thing yet), with a home-made user interface supporting a mouse and pull-down menus.
TRAX
Around the time when slide-show extravaganzas began to fade out, GUIs (graphical user interfaces) became a thing – initially championed by the Macintosh. We moved along by developing a control box that could control “everything” (the SMARTPAX) along with TRAX, a graphical software with windows, icons and menus for the Mac. While many cues were still targeting slide projectors, others controlled video playback devices, lighting, switchers, pyro, photo-CDs, etc.
The timeline in TRAX was arranged horizontally, with a time ruler at the top. Cues were arranged as icons along 16 horizontal tracks. These tracks didn’t really have any functional purposes, but allowed one to arrange cues neatly and keep things organized. They were also the inspiration for the program’s name and the slogan used in an ad campaign; “Do you have a sixteen track mind?”.
A significant addition along the way was the ability to have more than one timeline, where timelines could be started and stopped independently – even synchronized to different time sources. Pretty much any device in the system that had some concept of time (such as a Betacam video deck, a Laserdisc player or a SMPTE timecode feed) could act as a synchronization source. A Task window listed all the timelines along with their triggering conditions and special “Control cues” allowed timelines to interact with each other.
One reason for the multiple timelines was that we added general-purpose inputs and sensors, as well as a touch panel. The touch panel (TOUCHLINK) showed still images, buttons, faders and other controls on multiple pages. It was designed and programmed using TRAX. As touch panel controls and other inputs/sensors could be triggered at any time, we needed a way to respond to those asynchronous events. The idea was that each input would trigger a timeline to perform the desired actions. However, while serviceable, the timeline metaphor was often too rigid and inflexible to deal with such interactions.
WATCHOUT
After spending some time trying to come up with a more flexible and powerful solution, I eventually came to the conclusion that our problem definition was wrong. What our customers really wanted was to put on gorgeous shows with the minimal amount of techno-junk between their creative minds and the screen. Around the same time, computers became powerful enough to not just control the show but to be the show – playing pixels through multiple computers, graphics cards and digital projectors. This was essentially the same idea as the slide-based multi-image shows, but with slides, slide projectors and the control boxes replaced with networked computers with gamers’ graphics cards and DLP projectors.
The first version of WATCHOUT took some ideas from TRAX and its multi-track timeline (the internal project name for WATCHOUT was VideoTRAX). Instead of momentary cues, triggering projector lamps and other devices to create the visuals, the cues now were the visuals. The tracks along the timeline became image layers, allowing visuals to overlap. Non-rectangular shapes were handled by transparent image areas. Much of the UI was inspired by video compositing programs like Adobe After Effects. The main difference was that the “stage size” was virtually unlimited, since it was driven by a networked render farm. All rendering was done in real-time, making edits and content changes incredibly fast.
If you want to see what WATCHOUT looks like and how its timeline works, check out these videos.
Along the way, the concept of multiple timelines also made it into WATCHOUT. This allowed for different aspects of a show (or multiple, separate shows) to be run from a single system. Yet another kind of timeline added in WATCHOUT was the Composition – a concept also taken from After Effects. A Composition, while being a timeline in itself, can then be embedded inside an enclosing timeline, and there treated as if it were any other piece of content. In a sense, it could be considered a distant relative to the “timelines within a timeline” concept of MICSOFT.
PIXILAB Blocks
After leaving Dataton in the summer of 2015 to set up my own company, I immediately started working on what was to become Blocks. Much of my inspiration for WATCHOUT came from increasing computer performance, gamer’s graphics cards and local networks. Blocks was inspired by the more recent advancements in web technologies – both servers and browsers.
The web used to be quite messy while dominated by Microsoft’s Internet Explorer. This all changed when Apple came out with Safari. The basis for Safari was the Linux KHTML browser, which Apple then developed further into what they call Webkit. Due to its open source roots, Webkit could then be snapped up by Google and turned into Chrome. Eventually it even made its way into Microsoft, pushing out their own browser technology. Today, all major browsers (with the exception of Firefox) have their roots in KHTML/Webkit, so they are all quite similar.
Mobile phones were the other, major technology driver. Video on the web had previously been dominated by Adobe Flash. However, due to Apple’s reluctance to support Flash on iPhone, browsers soon acquired performant very video playback capabilities. To minimize battery consumption, phone browsers also gained hardware accelerated rendering pipelines, supporting both video playback and efficient compositing with high frame rates for smooth image transitions and animations.
At the other end of the food-chain, server technology also moved forward. While less visible from an end user’s vantage point, the server and networking infrastructure advancements were equally important. This included faster and more reliable cellular networks, better wifi, wired networks up to 10Gb (a 1000-fold increase over the original 10 Mb/second Ethernet). Linux became a dominant server operating system, fostering a lot of high-quality, open source infrastructure.
All this turned out to be a very powerful foundation for Blocks. Since I wanted Blocks to have great interactive capabilities and flexible control system functions, I didn’t start out with a timeline at its core (as was the case in TRAX and WATCHOUT). Instead, the almost infinitely flexible blocks-within-blocks structure lets you build all kinds of solutions. From basic slide shows with images, video, and web content to fully interactive presentations with touch screen navigation, 3D content as well as room control functions – or any mix thereof. This feature set, now referred to as “Display, Control, Interact – All in One System,” turned out to be very potent for many applications.
But this flexibility and customizability comes at a price; complexity! The timeline in TRAX (see above) was a limiting factor when TRAX was applied as a control system. Likewise, the timeline-only nature of WATCHOUT made it unsuitable for more interactive use cases. But nevertheless, timelines have one important advantage; they’re immensely understandable.
A Timeline for Blocks
A timeline presents a linear flow of events. No ifs and buts. To perform an action; add a cue at the desired time. Want it to happen a bit earlier or later; just move the cue. Want things to happen at the same time; stack them up together on separate tracks. A timeline is very visual. It’s easy to see what will happen and when. Press the spacebar and watch the time cursor march across the cues. It’s also very predictable, making it easy to follow its flow – something that rarely can be said about a control system based on more complex logic.
So timelines definitely have things going for them. Also, considering my personal background and our history as a company, it would seem like a “match made in heaven”. So why did it take almost 10 years? It turns out that mixing a timeline style of “programming” with the more interactive and flexible nature of Blocks isn’t easy. To some extent, Blocks also had other options filling similar needs, such as the Slideshow for sequencing content and the Synchronizer for synchronizing video, audio and subtitles across displays and mobiles. Blocks also talks to other systems with good timeline support, such as WATCHOUT, PIXERA and Medialon. But at the end of the day, putting a timeline into Blocks just became too tempting. I mean, it’s not like I don’t know how to do it ;-).
But what kind of timeline. Should it be a very basic timeline (like MIC3, mentioned earlier), just doing visuals? Perhaps a variation on the already existing Slideshow block, but with a time position attached to each slide? That would be quite understandable and fit nicely in Blocks. However, it would also be rather limited since timelines aren’t just for visuals – they’re equally useful for lighting cues and other timed control functions.
Or should it be a vertical “cue list” style (like MICSOFT)? That would work well for lighting cues and such. However, it’s not as intuitive and less practical for video, audio and other content with its own innate timing to consider and synchronize.
In the end I settled on the familiar horizontal timeline style, combining the best aspects of both WATCHOUT and TRAX. The WATCHOUT style, with cues extending in time, naturally represents A/V content, letting you clearly see where things begin and end. This style also works well for cues controlling lights and similar settings/presets applied over time spans.
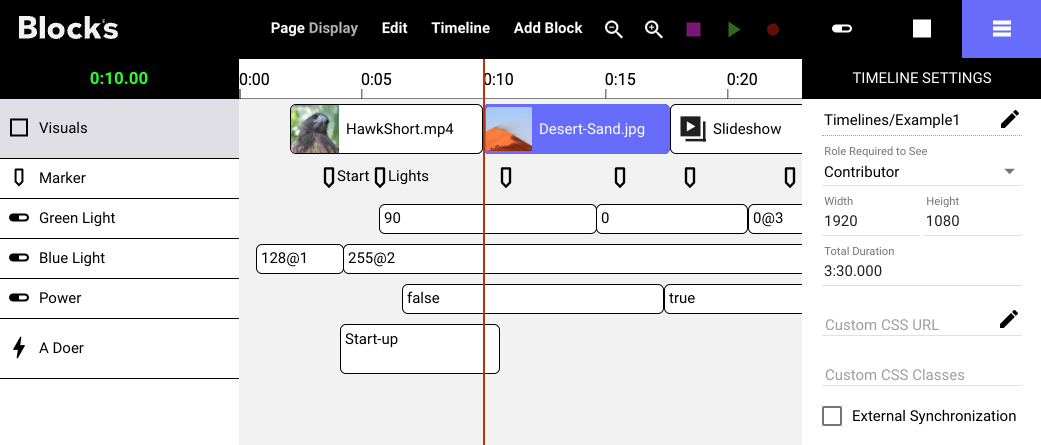
An important and very useful aspect of such a timeline is that all visuals, audio and lighting will track with you as you jump back and forth along the timeline – a great timesaver when tweaking or rehearsing a show.
Finally, there are discrete events that need to be timed. Those generally don’t have any intrinsic timing or duration. Examples include triggering a relay to activate some I/O function, sending a command to another system (similar to what String cues do in WATCHOUT) or calling a network device function with all parameters required – essentially what Blocks’ DO statements do in Tasks.
All this turned out to be a pretty tall order for adding a timeline to Blocks, which is partly why it took a while. But I believe the result is worth the wait. It combines the general intuitiveness of timelines with the best of what I did in WATCHOUT (with its visually oriented cues) as well as earlier in TRAX (which had more of a control flavor). All this also ties nicely into the general timing capabilities of Blocks, including SMPTE/EBU timecode sync. Hence, a timeline in Blocks can both be synchronized to anything that provides time and control (and synchronize) video, audio and other content placed on the timeline.
I think you’ll like it.